

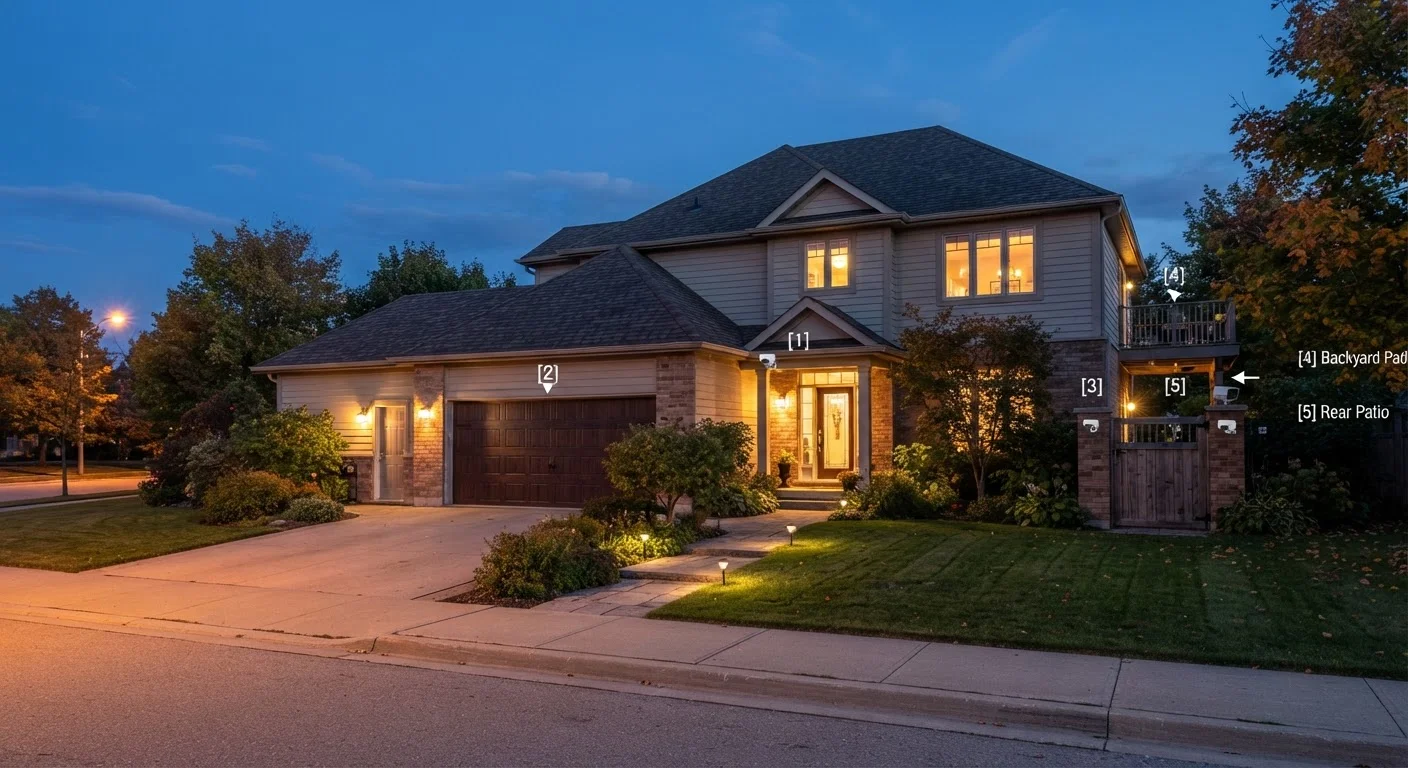
Key Takeaways
Why Coverage Gaps Happen in the First Place
Most homeowners approach camera placement by starting at the front door — the most obvious entry point — and working outward from there. That instinct isn't wrong, but it tends to stop too soon. The result is a setup that looks thorough on paper but leaves real vulnerabilities uncovered.
Part of the problem is how camera systems are marketed. Starter kits often include a small, even number of cameras, which can create the false impression that the included hardware covers a full home. In practice, property layouts vary enormously, and two or four cameras rarely cover every meaningful zone without deliberate planning.
For a broader framework on planning your full system from the ground up, see our step-by-step guide to DIY security setup. This article focuses specifically on the placement mistakes that create blind spots even after a system is installed.
The Most Common Camera Placement Mistakes
Understanding where gaps typically occur — and why — is the first step toward closing them.
Focusing only on the front door and ignoring side and rear entrances.
Why it happens: The front door feels like the primary risk because it's visible from the street, but side gates, back doors, and basement entries are frequently used in unauthorized entry scenarios precisely because they're less monitored.
Mounting cameras too high, reducing the ability to capture identifying detail.
Why it happens: Homeowners often mount cameras as high as possible to avoid tampering and maximize viewing range, but extreme height dramatically reduces the resolution of facial and clothing detail in the frame.
Skipping indoor coverage of main entry points and key common areas.
Why it happens: Many homeowners treat their security system as purely exterior, assuming outdoor cameras are sufficient. An indoor camera pointed at the interior side of a front or back door provides a crucial secondary record if outdoor footage is incomplete.
Leaving the driveway and detached garage uncovered beyond the immediate door.
Why it happens: A camera at the garage door captures what happens at the door itself, but misses vehicle break-ins, package theft near a vehicle, or movement deeper in the driveway.
Ignoring blind corners created by the home's own architecture.
Why it happens: L-shaped homes, bay additions, and recessed entries create natural shadows and corners that a single camera can't see around. Homeowners often don't notice these dead zones until they review footage.
Once you've identified the gaps in your exterior coverage, it's worth thinking carefully about camera type for each zone. Our guide on matching cameras to specific locations covers weatherproofing ratings, field-of-view specs, and night vision requirements by zone.
A Simple Walk-Through Method to Find Your Gaps
Rather than relying on memory or a floor plan, the most reliable way to audit your camera coverage is to physically walk your property as an outside observer would — starting at the street and approaching from multiple directions.
Check Local Privacy Laws Before Pointing Cameras Outward
Camera angles that capture significant portions of a neighbor's property, shared driveways, or public sidewalks may be subject to local ordinances or HOA rules. Before finalizing placement, verify what your local jurisdiction and any applicable community rules permit. This is especially important for cameras with wide fields of view or those covering shared spaces.
Walk your perimeter at three times of day: midday, dusk, and after dark. Each pass reveals different issues. Daytime shows you obstructions like shrubs and roof overhangs. Dusk reveals glare and sun-angle problems. After dark exposes lighting gaps that make footage unusable regardless of camera quality.
Make note of any path that leads to a door or window that isn't covered within the first few feet of approach. A camera that only captures someone standing at a door — rather than approaching it — gives you far less actionable footage. Coverage should begin at least 10–15 feet before an entry point where possible.
If you're renting and can't mount cameras freely, this process still applies — the Renter's Playbook for Home Security covers placement approaches that don't require drilling or permanent installation.
Maintaining Coverage as Your Property Changes
Camera placement isn't a one-time task. Seasonal landscaping changes — trees leafing out in spring, shrubs growing taller over summer — can gradually block a camera's field of view without anyone noticing until the footage is needed. Outdoor lighting changes, new structures like sheds or pergolas, and even a neighbor's new fence can all shift your coverage landscape.
~34%
Of break-ins occur at a rear or side entry
According to FBI Uniform Crime Report analyses, a substantial portion of residential burglaries involve entry points other than the front door, underscoring the need for multi-angle coverage.
8–10 ft
Recommended exterior camera mounting height
Security industry guidance generally suggests this height range as a practical balance between tamper resistance and capturing usable identifying detail in footage.
Set a reminder to do a full coverage walk-through at least twice a year, ideally in early spring and late fall when vegetation changes are most pronounced. During each review, check that camera lenses are clean, mounting angles haven't shifted, and that motion detection zones in your app still match the physical camera field of view. Small adjustments made regularly are far easier than discovering a months-long coverage gap after the fact.